Updated March 2026 — reflects the current official onboarding flow and post-ClawHavoc skill safety guidance.
If you have been trying to get OpenClaw running and somehow ended up with a CLI that works but an assistant that does nothing, you are not alone — and you are also not done. This OpenClaw setup guide covers every step that actually matters, from the very first install through to the moment your assistant answers a real question over Telegram. Not just “installed,” but genuinely working.
What OpenClaw Actually Is
OpenClaw, released as MIT open source in late 2025, is a self-hosted AI agent gateway. You run a single Gateway process on your own machine or server, and from that point it handles everything: routing messages, managing sessions, connecting to your model provider, and speaking to wherever you want to chat — Telegram, WhatsApp, Discord, iMessage, and more.
The Gateway is not a background detail. It is the part that makes all the other parts possible. Once that clicks, a lot of the setup process starts to make more sense — you are not just installing a chatbot, you are standing up infrastructure.
Official docs: docs.openclaw.ai — the primary reference for everything covered here. GitHub: github.com/openclaw/openclaw (196,000+ stars as of early 2026)
OpenClaw Setup Requirements: Node.js, API Keys & OS
There are only a few real prerequisites, but skipping this check is a reliable way to waste an hour later. Per the official getting-started docs, you need:
- Node.js 24 (recommended) — or Node 22 LTS (22.14+) if you are on an older setup
- An API key from a model provider: Anthropic, OpenAI, or Google
- A machine you control — your laptop, a home server, or a VPS all work fine
- About 15–30 minutes for a complete first run
Windows users: both native Windows and WSL2 are supported, but WSL2 is the more stable experience and what most guides assume.
Run this before anything else:
node --version
npm --version
If you are on Node 22.14 or newer, you are clear to go. If not, update Node first. Running an older version tends to produce silent failures — the kind that are annoying to debug because nothing actually tells you what went wrong.
How to Install OpenClaw in 2026 (Current Official Method)
A lot of tutorials out there are already trailing behind the current docs. The install path from the official OpenClaw documentation is a single script:
macOS / Linux:
curl -fsSL https://openclaw.ai/install.sh | bash
Windows (PowerShell):
iwr -useb https://openclaw.ai/install.ps1 | iex
Docker, Nix, and npm-global installs also exist, but for a first setup the script is the cleanest path — fewer steps, less to go wrong.
One thing worth flagging now, because most articles bury it or skip it entirely:
A successful install is not a successful setup.
The next section is where the real work happens.
The Most Important Step in OpenClaw Setup: Run Onboarding
Installation just puts the tool on your machine. What turns it into something usable — a configured gateway, a connected model, a real workspace — happens in onboarding. Skip this step and you will spend a lot of time wondering why nothing responds.
openclaw onboard --install-daemon
The official onboarding docs are clear that this is the recommended setup path, not an optional wizard. It walks you through model auth, workspace creation, gateway configuration, and optional channels all in one guided session.
Why --install-daemon?
Without that flag, the gateway does not run in the background — you would need to manually start it with openclaw gateway run every single time. With --install-daemon, onboarding registers the gateway as a proper managed service: launchd on macOS, systemd on Linux. It starts automatically, survives reboots, and is one less thing to remember.
For anyone new to this, removing that friction is worth a lot.
What Onboarding Actually Sets Up
It is worth being concrete here, because “onboarding” sounds like it might be optional orientation material. It is not. One session configures all of this:
- Your model provider and API key (Anthropic, OpenAI, Google, and others)
- Your workspace — where your agent keeps memory and skills
- Your gateway — the WebSocket server that routes everything
- Optional channels — Telegram, WhatsApp, Discord, etc.
- Optional background daemon — so the gateway keeps running without you
- A web search provider — which matters more than it sounds
That last one is easy to underestimate. A model without web access is smart but sealed off. Give it search, and the same model starts feeling immediately more capable. Set it up during onboarding rather than coming back to it later.
How to Verify Your OpenClaw Setup Is Working
Once onboarding finishes, do not just assume everything is fine. Check it. The official troubleshooting docs lay out a practical command sequence for exactly this moment:
openclaw status
openclaw gateway status
openclaw logs --follow
openclaw doctor
openclaw channels status --probe
What you want to see:
openclaw gateway status→Runtime: runningandRPC probe: okopenclaw doctor→ no blocking issuesopenclaw channels status --probe→connectedorready
If the gateway is not healthy, stop there and fix it before touching anything else. Channels, skills, and model responses all flow through the gateway — if it is off, nothing downstream will be right either.
Your First OpenClaw Chat: Use the Dashboard, Not Telegram
Most guides jump straight to Telegram here because it makes for a more exciting screenshot. It also means that when something goes wrong, you have no idea whether the problem is the channel, the model, the gateway, or some combination of all three.
The smarter move is to test in the dashboard first. The official docs recommend exactly this — it is the fastest first-chat path because it needs no channel setup at all.
openclaw dashboard
This opens the Control UI at http://127.0.0.1:18789/ in your browser. Send a message. If you get a response, your core setup — model, auth, gateway, workspace — is all working. When you then run into trouble with Telegram, you already know where the problem is not.
Security note from the official security docs: The Control UI has admin access to your whole setup. Keep it on localhost. For remote access, use Tailscale Serve or an SSH tunnel rather than exposing it publicly.
There is also something genuinely satisfying about seeing a response come back in the browser before you have connected anything external. It makes the rest of the setup feel like building on something that works, rather than troubleshooting in the dark.
OpenClaw Telegram Setup: The Beginner-Friendly First Channel
With the dashboard working, you have earned a real channel. Telegram is the right first choice — per the official channel docs, it needs only a bot token, with no QR pairing and no local session state to worry about. WhatsApp is solid too, but it has more moving parts. Save it for after your core setup is proven.
How to Set Up Telegram with OpenClaw
- Open Telegram and search for @BotFather
- Send
/newbotand follow the prompts - Copy the token BotFather gives you
- Run
openclaw channels addand paste the token when prompted - Restart the gateway if needed:
openclaw gateway restart - Open Telegram and message your new bot
A minimal working config in ~/.openclaw/openclaw.json looks like this:
{
  "channels": {
    "telegram": {
      "enabled": true,
      "botToken": "YOUR_TOKEN_HERE",
      "dmPolicy": "pairing"
    }
  }
}
The dmPolicy: "pairing" setting means only users you approve can message the bot — the right default for personal use.
How to Install OpenClaw Skills from ClawHub Safely (2026 Update)
Skills are what turn OpenClaw from a generic assistant into one that fits your actual life. Each skill is a folder with a SKILL.md that teaches your agent to do something specific — read email, check a calendar, clip video highlights, run a search. You find and install them through ClawHub (clawhub.ai), the official public skill registry.
openclaw skills search "calendar"
openclaw skills install <skill-slug>
openclaw skills update --all
⚠️ A Word on ClawHub Safety in 2026
Early 2026 brought a coordinated attack campaign researchers called ClawHavoc — approximately 1,467 malicious skills distributed through ClawHub, many using typosquatted names designed to look like legitimate tools. ClawHub responded by removing flagged skills, introducing author verification badges, requiring code signing for new submissions, and partnering with VirusTotal for automated scanning.
The registry is meaningfully safer now. But “safer” is not the same as “safe.” Before installing anything, check the VirusTotal scan on the ClawHub listing page, prefer verified authors with a real version history, and treat every skill like what it is: code that runs on your machine.
Full vetting checklist: ClawHub security docs
Which OpenClaw Skills Should Beginners Install First?
Start with 2–4 Skills. No More.
The temptation when you first get this working is to install everything that looks interesting. Resist it. Too many skills at once means you cannot tell which one is responsible when something behaves unexpectedly. Build a solid base first, then expand once you trust the foundation.
Skill #1 — Web Search
If onboarding already configured a web search provider, you may not need a separate skill here — that is often enough. If you want to extend it, search ClawHub for multi-search options and pick one with a clean VirusTotal report, a verified author badge, and no mandatory API key for basic use.
A model with search access feels like a different product than one without it. This is the one skill that pays off immediately, every day.
Skill #2 — A Practical Personal-Work Skill
Pick the one that matches how you actually spend your day:
- Email-heavy workflow → look for an IMAP/SMTP email skill. These can read and send email, check unread messages, search mailboxes, and flag mail as read or unread — all without leaving your agent.
- Google Workspace user → search ClawHub for Google Workspace integration skills covering Gmail, Calendar, Drive, Sheets, and Docs.
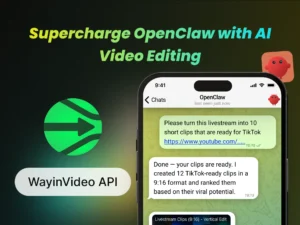
- Video creator (YouTube, TikTok, Instagram) → install AI Clipping (
wayinvideo/ai-clippingon ClawHub). It uses AI to scan a long video, identify the most engaging moments, and automatically export short highlights already formatted for the right platform — correct aspect ratio, auto-reframed, with optional captions. It connects directly to YouTube, TikTok, Facebook, Instagram, and several other platforms without any manual download step. The one thing it needs is a WayinVideo API key, which you can create at wayin.ai.

The point of this category is connecting your assistant to the thing you actually do every day. Pick one and stick with it through week one.
Skill #3 — Something Small and Easy to Verify
This category gets underrated because it does not sound impressive. Find a weather skill on ClawHub — current conditions and forecasts, usually no API key required. It sounds minor, but a skill that is trivially easy to test is genuinely valuable when you are still getting comfortable with the whole system. Install it, ask for tomorrow’s weather, and know within ten seconds whether it worked.
That habit — install, test, confirm — is worth building before you start connecting skills to your inbox or your calendar.
Skill #4 — Backup, Before You Think You Need It
Once OpenClaw is working, you will tinker. That is almost guaranteed. New channels, new settings, experimental skills, reconnected tokens — and at some point something will break in a way that is easier to restore than to diagnose. A backup skill archives your OpenClaw configuration, credentials, and workspace before that happens.
Search ClawHub for an OpenClaw backup skill and install it this week, not after something goes wrong. The security notes are worth reading too: backup archives include credentials and session state, so protect the storage location and consider encryption.
A Short Note on “Cool” Skills
ClawHub has skills that look exciting — browser automation, deep execution, broad system access. Some of them are genuinely powerful. Some carry security caveats that deserve attention before you install them.
The principle is simple: your first week with OpenClaw is for building stable usefulness, not maximum capability. The more powerful skills are easier to use — and easier to trust — once you have a setup you understand.
Two First Tasks That Prove Your Setup Works
Task 1: Research Something You Actually Want to Know
Ask your assistant to compare products, summarize a topic, or pull together a quick briefing. Keep it real — something you would actually Google.
- “Compare three beginner mechanical keyboards under $120 and tell me which one to buy.”
- “Give me a simple briefing on today’s biggest AI product launches.”
- “Find three good beginner cameras for travel and explain the tradeoffs.”
This hits model quality, web search, and gateway routing all at once, and the answer is easy to judge. A useful response here means everything is talking to each other the way it should be.
Task 2: Summarize One Real Slice of Your Own Information
If you installed an email or calendar skill, give it something bounded — not “organize my life,” but a specific, small ask.
- “Summarize unread emails from the last 24 hours into: urgent, important, and can-wait.”
- “List my meetings tomorrow and flag any conflicts.”
Starting narrow is not a limitation — it is how you build genuine trust with a new tool. Once you know it handles small tasks reliably, the bigger automations start to feel worth trying.
The Correct OpenClaw Quick-Start Sequence
# Step 1: Verify your Node version
node --version

# Step 2: Install OpenClaw
curl -fsSL https://openclaw.ai/install.sh | bash

# Step 3: Run onboarding — this is the step that actually sets things up
openclaw onboard --install-daemon

# Step 4: Open the dashboard and verify chat works in the browser
openclaw dashboard

# Step 5: Confirm the gateway is healthy
openclaw gateway status

# Step 6: Find and install your first skills from ClawHub
openclaw skills search "web search"
openclaw skills install <skill-slug>
OpenClaw Troubleshooting: Work Through It in Order
When something is off, the instinct is to start changing things. Usually a better move is to run the diagnostic sequence first and let it tell you where to look:
openclaw status
openclaw gateway status
openclaw logs --follow
openclaw doctor
openclaw channels status --probe
- Gateway unhealthy → fix that first, before anything else. Everything runs through it.
- Gateway healthy, channel not ready → the problem is in your channel config.
- Both healthy, assistant acting strange → trace back to the last skill you installed or the last auth setting you changed.
Running the sequence before changing anything saves real time. The official troubleshooting docs are built around the same principle.
Two Habits That Make OpenClaw Much Less Frustrating
Always Test in the Dashboard Before Blaming the Channel
If Telegram stops responding, open the dashboard and try there first. If it works, the problem is in the channel config — which is a much smaller problem than a broken gateway or bad model auth. Knowing what is not broken gets you to the fix faster.
Prefer Narrow Jobs Over Grand Automation in Week One
It is tempting to connect everything and automate your whole workflow in the first session. That usually ends with a tangle that is hard to unwind. A more useful progression:
- Answer questions
- Summarize information
- Retrieve specific things on demand
- Run one simple workflow
- Then combine tools and channels
The gap between day one and day seven looks small. The difference in what you actually understand and can rely on is significant.
What a Successful First Evening Looks Like
You do not need ten skills, three channels, or an autonomous workflow to call this a win. By the end of a real first session, you want:
- A healthy gateway (
Runtime: running,RPC probe: ok) - A working browser dashboard where chat actually responds
- One working external channel — Telegram is the natural first
- Two to four safely vetted skills from ClawHub
- At least one task your assistant has already completed that was actually useful
That is a finished first session. Everything after that is refinement.
Frequently Asked Questions
Q: What are the OpenClaw setup requirements in 2026?
A: Node.js 24 (recommended) or Node 22 LTS (22.14+), an API key from a supported model provider (Anthropic, OpenAI, or Google), and a machine you control. Full details at docs.openclaw.ai.
Q: How long does OpenClaw setup take?
A: Most beginners get through install, onboard, dashboard chat, and first Telegram message in 15 to 30 minutes.
Q: What is the first command I should run after installing OpenClaw?
A: openclaw onboard --install-daemon. That is the official recommended path — it configures the gateway, model auth, workspace, and optional channels in one guided session.
Q: Is ClawHub safe to use in 2026?
A: Safer than before the ClawHavoc incident, but still requires care. Check the VirusTotal scan on each skill’s listing page, stick to verified authors, and treat skills as code you are responsible for reviewing. The ClawHub security docs have a full checklist.
Q: Should I start with Telegram or WhatsApp?
A: Telegram. It needs only a bot token, has fewer moving parts, and is faster to debug if something goes wrong. WhatsApp is a solid second channel once everything else is stable.
Q: What does a healthy openclaw gateway status look like?
A: Runtime: running and RPC probe: ok. If either is missing, fix the gateway before you do anything else.
Q: Where is the OpenClaw official documentation?
A: docs.openclaw.ai — covers gateway configuration, channels, CLI reference, security, and troubleshooting.