YouTube has become a global platform for sharing ideas, tutorials, entertainment, and more. Whether you’re an aspiring vlogger, a seasoned content creator, or a business looking to expand your reach, knowing how to edit YouTube videos effectively is crucial. This guide will take you through the basics of video editing, explore various software options, and provide advanced techniques to create engaging content that captures your audience’s attention.
Why Editing Matters for YouTube Videos
Editing is more than just piecing together clips. It’s about crafting a story, enhancing visual appeal, and maintaining viewer engagement. Here’s why it’s so important:
- Engagement: Well-edited videos keep viewers hooked. Proper pacing, transitions, and effects prevent boredom and encourage longer watch times. Finding the most engaging moments within your raw footage is also key.
- Clarity: Editing allows you to remove unnecessary footage, ensuring your message is clear and concise. This is especially important for tutorials or informational content.
- Professionalism: Polished editing elevates the perceived quality of your content, building credibility with your audience.
- Brand Identity: Consistent editing styles help establish a recognizable brand, making your videos easily identifiable.
Before diving deep into full editing suites, it’s worth noting a crucial step many creators face today: extracting compelling short clips from longer videos for platforms like TikTok, Instagram Reels, or YouTube Shorts. Manually scrubbing through hours of footage is time-consuming. This is where AI-powered tools can be incredibly helpful. For instance, WayinVideo uses AI to analyze your videos and automatically pinpoint potentially viral moments, letting you find the perfect segments with simple text prompts or just one click. It can even prepare these clips with captions and the right aspect ratios for social media, streamlining your workflow significantly before you even start detailed editing.
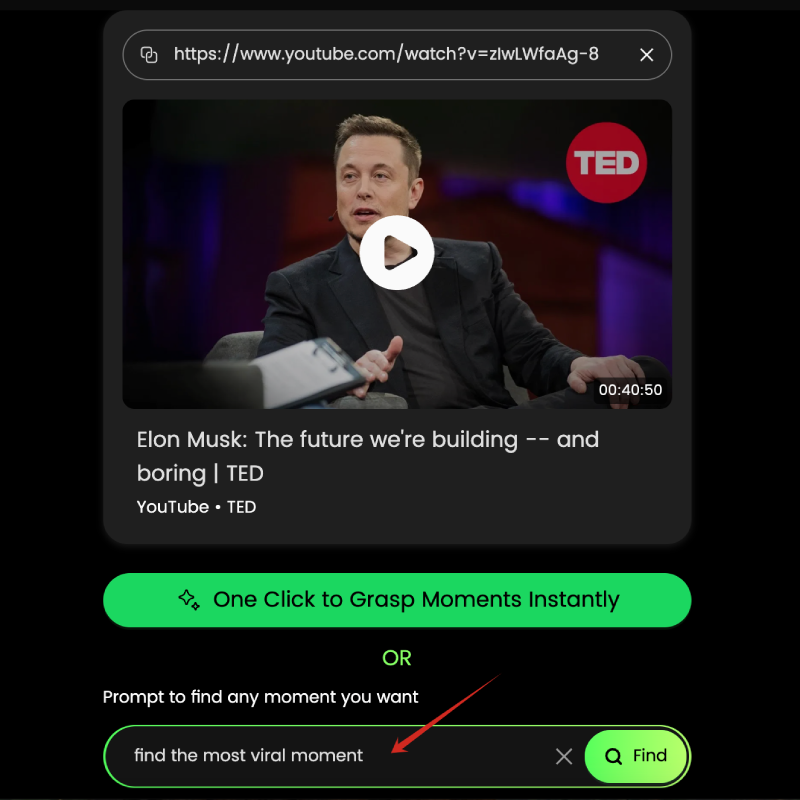
The screenshot shows how users can input a YouTube link into WayinVideo, along with a search prompt to find specific moments, like ‘find the most viral moment’. The AI accurately locates corresponding clips based on the input, saving significant time.
Factors to Consider
When choosing software, consider these factors:
- User Interface: Is it intuitive and easy to navigate for your skill level?
- Features: Does it offer the tools you need for your projects (e.g., color correction, audio mixing, effects)?
- Compatibility: Is it compatible with your operating system and computer hardware?
- Price: Does it fit your budget (free, one-time purchase, subscription)?
- Performance: Does it run smoothly on your computer, especially with higher-resolution footage?
Getting Started with YouTube’s Native Video Editor
YouTube offers a built-in editor for basic edits, accessible directly from YouTube Studio. While limited compared to dedicated software, it’s perfect for quick trims, cuts, adding license-free music, and blurring elements.
Overview of YouTube’s Native Video Editing Tools
The native editor provides simple tools for:
- Trimming: Cutting the beginning and end of your video.
- Cutting: Removing sections from the middle of your video.
- Adding Music: Incorporating audio tracks from YouTube’s audio library.
- Custom Blurs: Applying blurs to specific areas of the video (e.g., faces, license plates).
- Adding End Screens: Appending interactive end screens to encourage viewers to take additional actions.
Step-by-Step Guide
Here’s how to edit a video using YouTube’s native editor:
- Sign in to YouTube Studio: Go to studio.youtube.com and log in with your account.
- Select the Video: Click on “Content” in the left menu and choose the video you want to edit.
- Open the Editor: Click on “Editor” in the left menu.
- Trim the Video: Use the blue handles on the timeline to trim the beginning or end of the video.
- Cut Sections: Place the playhead where you want to make a cut, click “TRIM & CUT,” then “NEW CUT.” Drag the edges of the red box that appears to define the section you want to remove, then click the checkmark.
- Add Music: Click the “+ Add audio” track icon, browse YouTube’s library, preview tracks, and click “Add” to place one on the audio track. Adjust its position and level as needed.
- Add Blurs: Click the “+ Add blur” track icon, choose “Face blur” (automatic) or “Custom blur” (manual selection). Adjust the blur’s timing and position.
- Add End Screen: Click the “+ Add element” track icon, choose a template or add individual elements (video, playlist, subscribe button, link). Adjust their timing within the last 5-20 seconds of the video. Note that end screens have eligibility requirements (e.g., not available for videos marked as made for kids).
- Save Your Changes: Click “Save” to apply your edits. Processing may take time, during which viewers will see the original version.
Tips and Tricks
- Use Keyboard Shortcuts: YouTube Editor supports some basic shortcuts (check their help docs).
- Preview Regularly: Use the preview window to ensure your edits look and sound right.
- Don’t Rely on It for Complex Edits: It’s best for simple fixes after upload. For more involved editing, use dedicated software.
Editing Video Settings on Mobile
To edit video settings on Android using the YouTube app after uploading:
- Open the YouTube app on your Android Device.
- Sign in, if prompted.
- Tap your profile picture, then “Your channel.”
- Tap “MANAGE VIDEOS.”
- Find the video you want to edit, tap the three-dot menu next to it, and select “Edit” (or sometimes “Edit advanced settings in Studio” which takes you to the mobile Studio app or web).
- In the editing screen (either in the main app or Studio app), you can adjust the Title, Description, Visibility, Audience, Tags, Playlist additions, and other settings.
- Save your changes.
Troubleshooting Common Issues (Post-Upload)
- Video Quality: Ensure your original upload was in the highest practical resolution (e.g., 1080p or 4K). YouTube will process it for various streaming qualities.
- Audio Issues: If audio problems are discovered after upload, you might only be able to mute sections or add library music via the editor. Re-uploading with corrected audio is often better.
- Upload Errors: Check your internet connection stability and available device storage. Try uploading again.
Advanced Video Editing Techniques
Once you’re comfortable with the basics in dedicated software, explore advanced techniques:
Trimming, Cutting, and Splicing
- Trimming: Precisely removing unwanted footage at the start or end of clips.
- Cutting: Removing mistakes or unnecessary sections from the middle (using blade/razor tools). Making J-cuts and L-cuts (where audio leads or follows video) can create smoother transitions.
- Splicing: Combining multiple clips together on the timeline to form a sequence.
Adding Text and Photo Effects, Transitions, and Animations
- Text Overlays: Adding titles, lower thirds, captions, and annotations professionally. Using keyframes to animate text.
- Photo Effects & Color Correction/Grading: Enhancing visual appeal with filters, LUTs (Look-Up Tables), and detailed color adjustments for mood and consistency.
- Transitions: Using appropriate transitions (cuts, dissolves, wipes) between clips. Overuse can look amateurish; often a simple cut is best.
- Animations & Motion Graphics: Adding animated logos, graphics, or effects using keyframing or built-in effects within your software or specialized applications.
Fine-Tuning Intro and Outro Sequences
- Intros: Create a compelling, branded opening (often short, 5-10 seconds) that grabs viewers’ attention and sets expectations.
- Outros: Use the end of your video for calls to action (subscribe, watch next), social media links, and end screens placed strategically. Ensure videos are long enough (over 25 seconds) for YouTube end screens (up to 4 elements on a standard 16:9 video).
Creating Engaging YouTube Videos
Engagement goes beyond technical edits; it involves storytelling and viewer retention.
Crafting a Compelling Narrative
- Storytelling: Structure your video logically (even tutorials have a flow). Use hooks, build tension or interest, and provide a satisfying conclusion or call to action.
- Pacing: Vary the rhythm of your edits. Use faster cuts for action or excitement, slower pacing for explanations or emotional impact. Avoid long, static shots without purpose.
- Visual Variety: Use different camera angles, B-roll footage (supplementary shots related to the main topic), and graphics to keep the visuals dynamic.
Using Music and Sound Effects
- Music: Choose background music (often instrumental) that matches the video’s tone and isn’t distracting. Ensure you have the rights/license to use it.
- Sound Effects: Add subtle sound effects (SFX) where appropriate (e.g., pop-ups, transitions, emphasizing actions) to enhance immersion.
- Audio Levels: Mix audio carefully. Dialogue should be clear and prominent. Music and SFX should support, not overpower, the main audio. Maintain consistent levels throughout.
Common Mistakes to Avoid When Editing YouTube Videos
Avoid these pitfalls for a more professional result:
Audio Issues and Sync Problems
- Poor Audio Quality: Background noise, echo, or low volume. Use a decent microphone, record in a quiet space, and learn basic audio cleanup (noise reduction, equalization).
- Sync Problems: Audio drifts out of sync with video. Ensure your recording setup doesn’t cause drift, and double-check sync on the timeline, especially after cuts.
Troubleshooting Common Editing Issues
- Subtle Aesthetic Issues: Learn color correction basics to fix white balance and exposure. Use masking for targeted adjustments if one part of the frame needs fixing.
- Excessive Contrast or Darkening: Don’t just crank the contrast slider. Adjust exposure, highlights, shadows, blacks, and whites individually for better dynamic range and a natural look.
- Tint Issues: Use color correction tools (like HSL – Hue, Saturation, Luminance) to identify and neutralize unwanted color casts (e.g., fixing skin tones, removing green tints from shadows).
Best Practices for Reviewing and Revising
- Take Breaks: Step away from the edit to return with fresh eyes and catch mistakes.
- Get Feedback: Ask a trusted friend or peer to watch and provide honest feedback before publishing.
- Double-Check Everything: Review the final export for any glitches, typos in text, or audio issues.
Post-Production Limitations and Solutions
- Client Dissatisfaction with Angle/Position: (For client work) Discuss shot lists and angles before shooting. Set expectations clearly.
- Unwanted Background Objects: Try to frame shots carefully during filming. Use B-roll to cover cuts if needed, or consider masking/blurring minor distractions if feasible.
- Excessive Zooming: Avoid excessive digital zoom (which degrades quality). Use optical zoom during filming or physically move closer. Stabilize shaky footage if possible.
- Noise/Distractions: Record in quiet environments. Retake shots if significant noise occurs. Use noise reduction tools sparingly.
YouTube Video Editing Mistakes
Not Reading Histograms/Scopes:
Video scopes (like Waveform, Vectorscope, Histogram) provide objective information about exposure and color balance, helping avoid crushed blacks or blown highlights and ensuring consistency.
Solutions: Learn to read basic scopes to guide exposure and color adjustments accurately.
Global Adjustments Only:
Applying effects only to the entire clip might not fix localized issues (e.g., a bright window in an otherwise well-exposed room).
Solutions: Learn to use masks and secondary color correction tools for targeted adjustments.
Insufficient Contrast/Flat Look:
Images lack depth due to poor contrast between light and dark areas or dull colors.
Solutions: Use levels, curves, and color tools (beyond just a simple “contrast” slider) to enhance tonal and color separation. Check scopes.
Relying Solely on Auto Color Correction:
Automatic tools can be a starting point but often need manual refinement for accurate white balance and color.
Solutions: Use auto-tools as a guide, then fine-tune using color wheels, temperature/tint sliders, and scopes.
Over Saturation:
Pushing colors too intensely looks unnatural and can lead to artifacting.
Solutions: Use saturation controls carefully. Consider using vibrance (which affects less-saturated colors more) or HSL controls for targeted color adjustments. Desaturation can also be an effective stylistic choice.
Tools like WayinVideo can analyze the clipped content and automatically generate relevant titles, descriptions, and hashtags. This AI-powered feature helps optimize your short-form videos for discoverability on social media platforms.
Optimizing Video Size for Upload to YouTube
While YouTube handles compression, exporting from your editor with good settings is important. Software like Adobe Media Encoder or built-in export modules in editing suites offer presets. Aim for a balance between quality and file size using efficient codecs like H.264 or H.265 (HEVC). High bitrate isn’t always better if it drastically inflates file size for minimal quality gain. Check YouTube’s recommended upload encoding settings for guidance.
Methods for uploading videos include:
- Computer (YouTube Studio): Preferred method for full control over metadata, settings, scheduling, etc. Upload directly from your exported file.
- Android/iOS: Convenient for mobile uploads, but may offer fewer options during the upload process. Vertical/Square videos under 60 seconds may automatically be suggested or categorized as Shorts.
FAQ Section
What are the most common mistakes beginners make when editing YouTube videos, and how can they be avoided?
Beginners often overlook fundamentals like audio quality (use a good mic, monitor levels), pacing (avoid dragging sections or overly frantic cuts), color consistency (learn basic color correction), and overuse of effects/transitions (use them purposefully). Ensure audio/video sync is perfect. A huge mistake is neglecting storytelling – even simple videos need a clear structure (hook, middle, end/call-to-action). Avoiding these involves focusing on clear audio first, practicing cuts and timing, learning basic color correction tools in your software, using transitions sparingly, and planning your video’s structure before editing. Getting feedback is also crucial.
How can I optimize my videos for different social media platforms after editing for YouTube? Given various platforms have different video length and aspect ratio requirements
After editing a video for YouTube, optimizing it for other social media platforms is crucial to maximize reach and engagement. This process involves reformatting the video to meet the unique requirements of each platform, including different video lengths and aspect ratios.
- Aspect Ratio: Use your editor to reframe your 16:9 YouTube video into vertical 9:16 (for Instagram Reels/Stories, TikTok, YouTube Shorts) or square 1:1 (for Instagram/Facebook feeds). Ensure the main subject stays in frame.
- Length: Drastically cut down your video for shorter platforms. Reels/TikTok often perform best under 60 seconds, Stories in 15-second segments. Create snappy, engaging highlights.
- Content: Start with a strong hook immediately. Add captions/text overlays as many view social videos muted.
Tools like WayinVideo can help identify these key moments from your long YouTube video and even generate clips with captions suitable for different platforms, speeding up this repurposing process. Export each version separately with appropriate settings.
What are some effective strategies for improving video editing skills, and what resources would you recommend for continuous learning?
To become a skilled video editor, it’s crucial to adopt a multi-faceted approach that encompasses both theoretical knowledge and practical experience. Effective strategies include a range of practices that help refine editing skills.
- Consistent Practice: Edit regularly, even short personal projects.
- Deconstruct Professionals’ Work: Analyze editing choices in videos you admire (pacing, cuts, sound design).
- Master Fundamentals: Focus on clean cuts, smooth audio, basic color correction before fancy effects.
- Learn Your Software Deeply: Explore beyond basic functions; learn shortcuts.
- Seek Feedback: Join communities (online forums, local groups) and share work for constructive criticism.
- Follow Industry Trends: Keep up with new techniques and software updates via blogs, YouTube channels (like Film Riot, Premiere Gal, Casey Faris for DaVinci Resolve), and online courses (Skillshare, Udemy, Coursera).
- Experiment: Don’t be afraid to try new things and develop your own style.
Conclusion
Mastering YouTube video editing is a journey that combines technical skills with creative storytelling. By understanding the basics, exploring advanced techniques using capable software, potentially leveraging AI tools like WayinVideo for efficient clipping, and continuously learning, you can create engaging content that captivates your audience and elevates your channel. Remember to experiment, seek feedback, and always strive to improve your craft.